Tag Archives: model-view-viewmodel

How to close a View from a ViewModel ?

Note: I wrote this article to clarify relationships between ViewModel and View classes. If you want a complete solution you should take a look at existing MVVM framework like Cinch (by Sacha Barber).

Yesterday, there was an insteresting question about MVVM on StackOverflow: “How to close a View from a ViewModel ?”

Like always with WPF, there are many approaches to solve this problem.

Solution 1: give a reference to the View in the ViewModel

You need to control the View from the ViewModel ? Just gives a reference to the View in the ViewModel constructor.

public Window1()
{
  this.DataContext = new Window1ViewModel(this);
}

Unfortunatelly, this approach has several drawbacks:

  • it breaks the foundamental principle of the MVVM methodology: the ViewModel should be an abstraction of the View
  • it complicates the work needed to unit test your ViewModel
  • it introduces high coupling between the ViewModel and the View

Solution 2: the ViewModel raises an event when it wants to close its associated View

If having a reference to the View in the ViewModel is not the right thing, why not using an event. We can add a RequestClose event in the ViewModel class and raise this event when the ViewModel wants to close its associated View.

The View, when it creates the ViewModel subscribe to the RequestClose event. In the event handler, the View is closed.

// class is omitted, only constructor is shown
public Window1()
{
  var viewmodel = new Window1ViewModel();
  viewmodel.RequestClose += (s, e) => this.Close();

  this.DataContext = viewmodel;
}

Solution 2, first refinement

Of course I prefer the event based solution, but we can improve it. The first refinement we can do is to make sure the event will be coherent over all our classes. To achieve this I setup an interface:

public interface IRequestCloseViewModel
{
  event EventHandler RequestClose
}

This interface is implemented by my ViewModel classes which wants to support the ability to close their associated Views.

Solution 3, second refinement

Another possible refinement is to automate the subscription of the RequestClose event in the View. To do that, I created an abstract ApplicationWindowBase class that inherits from Window. When the DataContext changes, I check if the IRequestCloseViewModel is supported by the DataContext:

public class ApplicationWindowBase : Window
{
  public ApplicationWindowBase()
  {
    this.DataContextChanged += new DependencyPropertyChangedEventHandler(this.OnDataContextChanged);
  }

  private void OnDataContextChanged(object sender, DependencyPropertyChangedEventArgs e)
  {
    if (e.NewValue is IRequestCloseViewModel)
    {
      // if the new datacontext supports the IRequestCloseViewModel we can use
      // the event to be notified when the associated viewmodel wants to close
      // the window
      ((IRequestCloseViewModel)e.NewValue).RequestClose += (s, e) => this.Close();
    }
  }
}

Like I said in the intro, this a very basic implementation of this concept. Many other approach exists. A good source of information is in the source code of existing MVVM frameworks.
Adding transitions to a MVVM based dialog

In my last blog post about MVVM, I showed how it is natural to build a common WPF dialog using DataBinding and Templates with the Model-View-ViewModel methodology. Because I’m having a lot of feedback on posts I wrote about how transitions can be done in WPF, I decided to reuse my previous demo application and add transitions when switching from one element to another. Here is the result of the demo application:

[flashvideo file=download/mvvm_transitions.flv /]

I didn’t wanted to implement all the transitions, instead I decided to use the famous FluidKit library and to wrap its transition control into a reusable and “MVVM compliant” control. I thank Pavan Podila for giving me feedback while designing this control.

Basically, based on Pavan suggestions I created an INavigationAware interface and subclass transitions I wanted to reuse from FluidKit. The INavigationAware interface allows me to specify that the transition supports going forward and going backward (regarding the previous and current selection of the user in the menu).

The control itself (that I call a NavigationPresenter) is very simple, I just use 2 ContentPresenter that I switch when the Content property changes using the TransitionPresenter control from the FluidKit library. The NavigationPresenter works with 3 dependency properties:

  • GoForward (bool): to specifiy the way of the transition
  • Transition: to specify the transition to use
  • Content: to specify the content of the control

Here is the XAML for using the NavigationPresenter


The sample application comes with 3 animations but more can be used from the FluidKit library. It’s also possible to create your own transition (inherit from Transition base class). You can download the sample application here. Hope you’ll like it !

Thinking with MVVM: Data Templates + ContentControl

I’m still playing with MVVM at work and I got a new occasion to setup a dialog using the MVVM methodology.

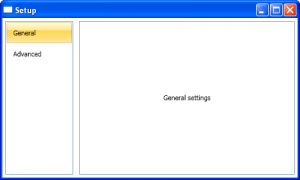
I really love the process of creating User Interface using MVVM, the process is so much natural ! Basically, I needed to create a “setup” dialog in the application I’m currently working on. I wanted to achieve something like this:

setup-dialog

Of course, I wanted to create this dialog using the power of WPF. My primary objective when I create a new dialog is to keep the code-behind empty. Using MVVM it took me about 10 minutes to create the basic structure of the dialog withouth writting a single line of code in the xaml.cs files.

Here is the process I followed to create this dialog. This is the “thinking with MVVM” part because I’m explaining the reasoning I had 🙂 You can download the source code for this example here.

Setup the main dialog

When I need quick prototypes, I often don’t use Blend and type the XAML directly into Visual Studio editor. That was the very first part I did to write this XAML:


Pretty easy isn’t it. Please note the “Content goes here” comment. I knew I wanted to put the settings dialogs here, but I didn’t know how… I named this file ConfigurationDialog.xaml.

Create sub-configuration dialogs

For this example, I created 2 sub-configuration dialogs just for the demo. I just put a TextBlock into a Grid to demonstrate the principles. Of course, we should add real configuration controls such as CheckBox, TextBox, etc. Those 2 new files are GeneralSettingsView and AdvancedSettingsView and are UserControls.

Create a ViewModel class for each View

I used to use an abstract base class for all my ViewModel classes where I implement the INofityPropertyChanged interface. I also use a trick from Josh Smith to throw an exception if the property name doesn’t exist when the PropertyChanged event is raised.

That gives us 3 new files: ConfigurationDialogViewModel, GeneralSettingsViewModel and AdvancedSettingsViewModel. Because I wanted configuration dialogs to have a common Name property (to identify them in the UI), I created a base class SettingsViewModelBase.

Setup the ViewModel of the main View

I needed the main View to expose the other configuration views available. I used an ObservableCollection for that:

public class ConfigurationDialogViewModel : ViewModelBase
{
        private readonly ObservableCollection settings;

        public ObservableCollection Settings
        {
            get { return this.settings; }
        }

        public ConfigurationDialogViewModel()
        {
            this.settings = new ObservableCollection();

            this.settings.Add(new GeneralSettingsViewModel());
            this.settings.Add(new AdvancedSettingsViewModel());
        }
}

Setup the main View  to consume datas from its ViewModel

I did some changes in the XAML to databind the ListBox’s ItemsSource property to the ViewModel. Because I always set the DataContext property of a view to its associated ViewModel, there is no ambiguity:

ItemsSource="{Binding Settings}".

The ListBox control has no idea how a SettingsViewModelBase object (that is in the associated ObservableCollection) should be displayed. We need a simple DataTemplate to specify this information:


And finish using my favourite part !

We just setup a ListBox to consume a collection of SettingsViewModelBase class to build a menu, fine. By using a very simple DataTemplate, we said: “I want to render the SettingsViewModelBase object in the ListBox using a TextBlock”.

We can take this reasoning one step further. We have a View associated to each SettingsViewModelBase. ListBox was fine to have a collection of controls. How could we display only one control ?

We can use a ContentControl of course ! Because we want do display the dialog that is currently selected in the menu, we can use a simple DataBinding (here, the ListBox has been named ListBoxMenu):


One more time, we got a rendering problem. The ContentControl doens’t know how to render a SettingsViewModelBase object. Well, it’s not a big deal, just specify it:


What I’m saying here is that GeneralSettingsViewModel should be rendered using a GeneralSettingsView. That’s exactly what we need ! Because the Views are created using a DataTemplate, we do not need to setup the DataContext, it will be automatically registered to the templated object, the ViewModel.

Conclusion

The example I describe here is very simple. The goal was to show the process of creating a dialog thinking in the “MVVM” way. It was very natural to use the concepts I explain here. The code-behinds are completely empty and ViewModel classes are testable ! Because the View are XAML only, I can give them to a designer that will tweak them to make them have a nice look.

You can download the source code for this example here.