Tag Archives: wp7

Welcome Windows Phone 8.0 SDK

It has been a long time since my last blog post, but today is an important day for any Windows Phone developers: the 8.0 SDK is now available. Because I’m a lucky guy I had the chance to be part of the selected developers who got an early access to the SDK. Today is finally the day where I can publicly share all the goodness of the new version with you 🙂

You can grab the SDK here. An ISO link is also available using this link. Please note a new website is also available for design resources at: https://dev.windowsphone.com/en-us/design

In the next couple of days I will share a set of articles about this new SDK. In this first post, I will showcase the changes of the SDK itself.

Requirements

The requirements for running the 8.0 SDK are the following:

  • Windows 8 x64
  • Visual Studio 2012 RTM
  • To use the emulator: An Hyper-V capable machine (your CPU must support SLAT or Second Level Address Translation)
You can very quickly check if your hardware is able to run Hyper-V by trying to activate it from Windows 8. Do to so:
  • press the Windows key
  • type “Turn windows features”
  • choose “Turn windows features on/off” in the Parameters section
  • see if you can check “Hyper-V / Hyper-V platform”
You can also check-out this article on ZDNet for a more complete overview of the requirements to run Hyper-V.
Installation
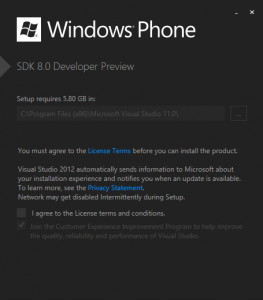
The installation is very straightforward as soon as you meet the requirements. Note that the installer UI is nice and similar to the new one available in Visual Studio 2012:
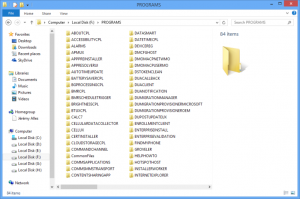
The installation of the SDK is available at the following path: C:\Program Files (x86)\Microsoft SDKs\Windows Phone\v8.0

Emulator

Because the emulator now runs on top of Hyper-V, and is based on a Windows 8 kernel, the image file is actually a VHD file !

And because a Windows 8 is now able to mount image-disk file without any additional software, you can just double click it to browse the content of the Windows Phone 8 file system. Of course unless you’re a some kind of hacker you want to deep dive into the core of the OS, this might not be very useful to you 😉

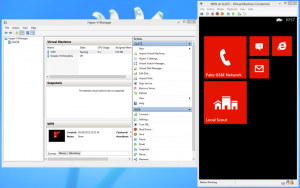
Another fun thing, because the emulator is using Hyper-V and because the images of the WP8 are in a VHD file, you can just create a new virtual computer in Hyper-V and set this VHD file as a hard drive to boot the WP8 right from Hyper-V:

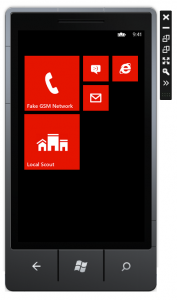
Actually, despite many changes under the hood, the emulator will look very familiar to any WP7 developer. Without any doubt the most visible change will be the new start screen:

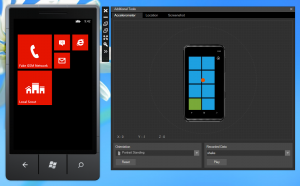
Note that we have the same tooling added with the release of Mango (accelerometer & location simulators + snapshot tool):

However, please note that the emulator no longer supports HW accelerated graphics. That means you will probably have less good performance (ie. framerates) that you did on the previous emulator. Make sure to run your test on a real device to make sure performance are good.

Visual Studio 2012 integration

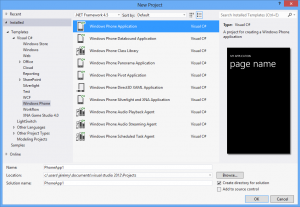
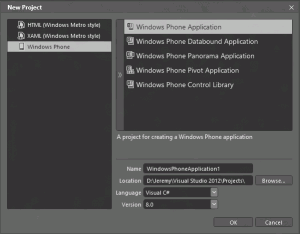
The 8.0 SDK adds new project templates:

  • In the C# section
    • Windows Phone Direct 3D XAML application: “A project for creating Windows Phone managed application with native interop”
  • In the C++ section
    • Windows Phone Direct3D App: “A project for creating a Windows Phone application that uses Direct3D”
    • Windows Phone Runtime Component: “A project for creating a Windows Phone Runtime component for a Windows Phone app”
    • Empty Dynamic Link Library: “A project for creating a native dynamic-link library for a Windows Phone app”
    • Empty Static Link Library: “A project for creating a native static library for a Windows Phone app”
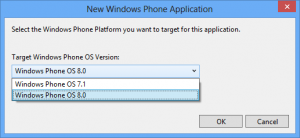
Note that you can still targets the 7.1 OS when you creates your application in VS12:

If like me you’re a C# Async fan you will need the Async Pack for Visual Studio 2012 in order to enable async support in your 7.1 projects. You can very easily add this supports using a NuGet Package (Microsoft.Bcl.Async). See this post for more details: http://blogs.msdn.com/b/bclteam/archive/2012/10/22/using-async-await-without-net-framework-4-5.aspx

Support for new screen resolutions

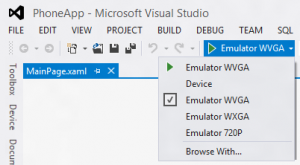
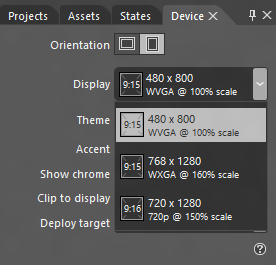
Windows Phone 8.0 devices will come with various flavors regarding screen resolutions. You might remember that the first initial announcements of Windows Phone 7.0 also stated 2 resolutions but we saw only 800×480 devices so far. This is going to change in 8.0 and the emulator now supports this:

Blend for Visual Studio

The SDK comes with a version of Blend that can be used with Windows Phone 8 projects:

You will find templates for XAML-bases projects:

And support for new screen resolutions:

Conclusion

This is just the beginning ! They are a tons of new opportunities with this release of Windows Phone ! In the next blog post, I will highlight various new APIs available to the developers.

I’m glad to see the ability to write app using native code. Funnily enough after spending 4 years doing only C# in my professional job I moved a couple of weeks ago to a mixed C#/C++ world – and I’m liking it so far 😉

Finally, I’m looking forward improving the 2Day app I have in the marketplace and finding ideas for new apps.

Animating item selection in a WP7 application

Another day another occasion to share an implementation detail behind my 2Day todo-list application. In this post I share the code used to animate the selection in a ListBox. Here is what is looks like in the create/edit folder dialog of 2Day:

[mediaplayer src=’/wp-content/uploads/2012/09/Listbox-animation.mp4′ ]

You can grab the source code directly here if you want.

Background

The basic idea is to create another element behind the ListBox which will be animated when the selection changes. The tricky part is to find out the appropriate coordinates of this element to make sure it’s perfectly on top of the element we need to higlight.

XAML

The XAML is not very complicated. Notice I use a particular style on the ListBox to remove its scrolling capability. I have to do that because otherwise if the user perform a drag gesture on the ListBox, it moves its element without moving the overlay I need to add. I use a simple Grid to be able to add the overlay “behind” the ListBox:


Code

The code is for now in the code-behind of the view (see next paragraph for improvements ideas). I use the ItemContainerGenerator property of the ListBox to retrieve the UI element from the Data element (in this example: an integer).

Then I use the TransformToVisual method to get the location of the visual relative to the parent ListBox. Next step is to animate the position of the item using DoubleAnimations:

public partial class MainPage : PhoneApplicationPage
{
    private readonly Point emptyPoint = new Point();
    private DoubleAnimation animationX;
    private DoubleAnimation animationY;
    private Storyboard storyboard;

    public MainPage()
    {
        InitializeComponent();

        this.listbox.ItemsSource = Enumerable.Range(1, 32);

        this.Loaded += this.OnLoaded;
    }

    private void OnLoaded(object sender, RoutedEventArgs routedEventArgs)
    {
        this.Loaded -= this.OnLoaded;

        this.listbox.SelectionChanged += this.OnSelectionChanged;

        this.overlayHost.Height = this.listbox.ActualHeight;
        this.overlayHost.Width = this.listbox.ActualWidth;
        this.overlayHost.Margin = this.listbox.Margin;

        this.UpdateHighlightedItem();
    }

    private void OnSelectionChanged(object sender, SelectionChangedEventArgs e)
    {
        this.UpdateHighlightedItem();
    }

    private void UpdateHighlightedItem()
    {
        var element = this.listbox.ItemContainerGenerator.ContainerFromIndex(this.listbox.SelectedIndex) as FrameworkElement;
        if (element != null)
        {
            // compute the location of the selected element
            Point destination = element.TransformToVisual(this.listbox).Transform(this.emptyPoint);
            Point origin = this.iconOverlay.TransformToVisual(this.listbox).Transform(this.emptyPoint);

            var translateTransform = this.iconOverlay.RenderTransform as TranslateTransform;
            if (translateTransform == null)
            {
                translateTransform = new TranslateTransform();
                this.iconOverlay.RenderTransform = translateTransform;

                TimeSpan duration = TimeSpan.FromMilliseconds(150);
                IEasingFunction ease = new QuarticEase { EasingMode = EasingMode.EaseOut };

                this.animationX = new DoubleAnimation { Duration = duration, EasingFunction = ease };
                this.animationY = new DoubleAnimation { Duration = duration, EasingFunction = ease };

                this.storyboard = new Storyboard();
                this.storyboard.Children.Add(this.animationX);
                this.storyboard.Children.Add(this.animationY);
            }
            else
            {
                this.storyboard.Stop();
            }

            Storyboard.SetTarget(this.animationX, translateTransform);
            Storyboard.SetTarget(this.animationY, translateTransform);
            Storyboard.SetTargetProperty(this.animationX, new PropertyPath(TranslateTransform.XProperty));
            Storyboard.SetTargetProperty(this.animationY, new PropertyPath(TranslateTransform.YProperty));

            this.animationX.From = origin.X;
            this.animationY.From = origin.Y;
            this.animationX.To = destination.X;
            this.animationY.To = destination.Y;

            this.storyboard.Begin();
        }
    }
}

Possible improvements

As you have seen, the current code is not easy to reuse. I think all the logic cold be embedded in a reusable component. Either using an attached property (and tweaking the template of the ListBox) or by subclassing the orginal ListBox class. I leave this exercise to the reader 🙂

Conclusion

In this article I shared the technique used in 2Day to animate the item selection. Many improvements are possible on top of this code, but I hope it could help WP developers.

Download the source code here if you want.

SQL database version management in a Windows Phone 7 application

This is the second tips’n’tricks post talking about the stuff I discover while working on the 2Day todo-list application for Windows Phone. In my last blog post I talked about random ArgumentException. This time, I’m talking about the way to handle version management in SQL database in a Windows Phone 7 app.

As soon as you want to push an update to an existing app using a SQL database you will have to deal with version management. The basic idea is that you might want to alter the schema of the database (for examples by adding tables or columns) while not breaking compatibility for your existing users. You must therefore be able to upgrade your database from version N to version N + 1.

On the Windows Phone platform, this is done using the DatabaseSchemaUpdater class. You can get an instance of this type using the CreateDatabaseSchemaUpdater() method of your DatabaseContext. You can then change the database by using the AddTable and AddColumn methods. You can retrieve the version of the database by using the DatabaseSchemaVersion property.  Simple, isn’t it ?

Here are some tips to update your database properly:

  • define all your update operations in a single class – it will be easier for you to manage future updates
  • define the current version of your database using a constant in your class – check this constant agains the DatabaseSchemaVersion property to determine if you must perform an upgrade
  • handle incremental update, when you push an update for version 3, you can still have users with version 1 or 2, so handle upgrade from 1 to 2 and from 2 to 3 incrementally
  • when you add new column to an existing table, the type of this colum must be nullable (bool?, string?, etc.)

Here is what the code looks like in 2Day:

using Japf.ToDo.Core.Model;
using Microsoft.Phone.Data.Linq;

namespace Japf.ToDo.Core.IO
{
    public class DatabaseVersion
    {
        // database history
        // v0. Feb. 20th 2011 first version
        // v1. May. 7th 2012 add the SpecialFolders table
        // v2. May. 19th 2012 add the Progress column in the Task table
        // v3. Auguest. 12th 2012 add the IsFocused column in the Folders & SpecialFolders table
        public const int Version = 3;

        public static void UpgradeIfNeeded(DatabaseContext context)
        {
            DatabaseSchemaUpdater dbUpdater = context.CreateDatabaseSchemaUpdater();
            if (dbUpdater.DatabaseSchemaVersion < Version)
            {
                // handle update for user with version 0
                if (dbUpdater.DatabaseSchemaVersion == 0)
                {
                    From0To1(context);
                    From1To2(context);
                    From2To3(context);
                }
                // handle update for user with version 1
                else if (dbUpdater.DatabaseSchemaVersion == 1)
                {
                    From1To2(context);
                    From2To3(context);
                }
                // handle update for user with version 2
                else if (dbUpdater.DatabaseSchemaVersion == 2)
                {
                    From2To3(context);
                }
            }
        }

        private static void From0To1(DatabaseContext context)
        {
            var dbUpdater = context.CreateDatabaseSchemaUpdater();

            // add a new table containing where each row is a SpecialFolder
            dbUpdater.AddTable();

            // add a column to the existing table Folder named ShowInSpecialFolders
            dbUpdater.AddColumn("ShowInSpecialFolders");

            // update the version of the schema
            dbUpdater.DatabaseSchemaVersion = 1;

            // send the changes to the db
            dbUpdater.Execute();

            // do not reuse the DatabaseSchemaUpdater for other update as it still contains
            // instructions to add the new table and the new column
        }

        // other methods omitted for clarity...
    }
}

Hope it helps 🙂